Translate

Thursday, June 18, 2015

Dad Mini Book

Father's Day 2015

As Father's Day approaches, I feel my heart hurt because my
father won't be here to share it with me.   He had a stroke 
Jan. 1, 2012 and passed away 17 days later.  It was definitely a sad 
way to begin the new year....and those 17 days were some of the
hardest days I have had to endure, but I wouldn't
trade those days for anything.  I spent almost the entire
17 days with my dad and was with him as he passed away.
I was always a daddy's girl...there are so many wonderful 
memories to treasure and hold on to. 
My daddy loved the Smoky Mountains.  
I have wonderful memories of us hiking and 
camping there throughout my entire life.
One of my favorite quotes is:
"When you are in the mountains 
you are closer to Heaven." 
 I miss him so very much every single day, but
I  believe he is in a better place, 
free of sickness and pain.
 So since he has passed away, I realize that the time
I have left on this earth is very precious and that I really need
to work harder on documenting and scrapping the family
history that I have in boxes in my basement.  I feel that 
this is my mission in life, to get the pictures, that have been
packed up for so long, in memory books, so they
can be enjoyed and treasured by my family.  In some of my 
earliest posts I posted a few of the projects I did for my 
daddy for his 80th birthday. 
 I will always be grateful that I was able to complete
those projects before he passed away.
Here is a picture of my daddy taken during Christmas of 2011:
I love you daddy, and I always will.

So treasure the family times and take pictures.
And after you take your pictures....do 
something with them. 

When I designed for EMI Scrapbooking Store
I designed mini books all the time.
This is where I learned so much about the 
scrap booking industry.  My love for scrap booking
just continues to grow and grow....I really love it....
Creating with paper and photos just makes me happy, happy, happy!!!

Here is a mini book titled "#1 Dad"
that I designed for EMI a few years back.
It was made with American Crafts Paper. It has some
cute little flips, flaps and pockets for a lot of photos.


I hope you enjoyed checking out this adorable mini book
designed, for EMI Scrapbooking Store,
 for a special "DAD!"
I supplemented red, white, blue, and 
craft cardstock in this book.
I used some star brads and brads, ribbon, twine, black ink and
stamps to embellish this book.  For the most part,
 it was made with glue, chipboard and paper. 
This paper line titled Chap by American Crafts was a 
favorite of mine to use for any project for a male in 
your life.  I still have some of it waiting for that 
"PERFECT" project!  


Tuesday, June 16, 2015

TIM HOLTZ JUNE TAG 2015

Tim Holtz June Tag 2015


Tim is just sooo talented....He doesn't have to TRY to hit
something spot on.....it just happens.  I'd say this tag is just
right...ya know...PERFECT!
If I had to do a project that needed this coffee cup..this is
what I would go for.  And what a great idea for a gift too....
sticking that little gift card behind it...
Tim just thinks of EVERYTHING!!!
 For me though, I am not a daily 
Starbucks visitor. I might meet a girlfriend there every now
and then, or if I'm on a road trip, I would definitely have 
a Starbucks Stop....especially for their frappuccinos.....YUM!
I would much rather have my coffee at home every morning out
on the deck and save my sheckles for more scrapbook supplies.....
LOL!!!!!!!!!!!!!!!
So the starbucks coffee die has not been on my long list of must 
haves...but as with anything Tim has his name on..I usually gotta
own it.
But as of right now I don't own that die and I don't have a close 
friend that has it either, so I got out my favorite coffee cup and
my graph paper and drew my little cup with it's large 
heart on it, cut it out and and decided it would be
PERFECT for me for my June tag.

So here's my take on Tim's June Tag...
Morning Love...Homemade


Do you ever have one of those days when you are trying
to complete a project and you feel as if nothing is working right???
I usually just go with those little mistakes and let them roll 
right off...must be left over from our stay in the hospital in May.
I'm thinking I wanted to redo my background, I felt my ink
was too much, but then my heat tool broke so I stuck with my first go.
Then, when I tried to sew, my little ole machine was cranky
 ...I won't tell you how many times I had to cut out my little coffee mug cause
my bobbin was being fussy. 
But I stuck with it and I "LOVED" how this all came together.
I look at it and think back to my coffee -
my favorite is Keurig - K - cup Tully's Hawaiian blend, I have with my favorite
creamer -"SWEET ITALIAN"  and it makes me want to have 
another cup.  

My "Blend" of Supplies I used different from Tim
Paper Scraps:  Heidi Swapp - Vintage Chic - Just Dots,
Core'dinations - maplenut,
Red, White, Black and Butterscotch card stock
Vellum
Chipboard 
Cotton Ribbon
Wired Burlap Ribbon
Black Hemp Cord
Material:  black ric-rac
Distress Ink - Antique Linen, Barn Door, Festive Berries, 
Fired Brick and Walnut Stain 
 Dies - TH - Artful Arrows, Love Struck
Sizzix - Love Flourish
I used a Teresa Collins punch for the sun but if I had 
thought about it more, I would have used Tim's Labels Die #660060.
That has the graduated sizes and I wouldn't of hand cut 
the larger one....but no worries...it may have taken me longer, 
but I got it done and got the look I wanted.  I distressed and inked the suns.
Black Sharpie - I backed the heart with chipboard and went around 
the chipboard with the sharpie.  I then backed the heart with black 
card stock and hand cut that out so it would shadow the heart and 
help it to "Pop" off the cup.
I made my cup out of white card stock and backed it with chipboard, then 
inked it with antique linen.  
I hand cut the banner of the days of the week and
the sun (I punched the heart,
 backed it with red card stock
and glossy accented the heart and stamped  it with love).
I also distressed and inked the banners and the tag.
 Typewriter 
Fiskars - small heart hand punch
Tim's Tiny Attacher
Making Memories - mini shimmer alphas - black metro
MSE: My Sentiments Exactly Stamp - love
Making Memories Metal Charms- Amour - 32570
 Glossy Accents
Beacons
Pop dots

I am so glad I didn't have a "redo on my plaid background."
 The background colors stand out really well on the tag...
...Mmmm..I would love to have some paper like that...
Ohhhh I can do that...I know how...because Tim taught me...
 
Thank you so much for stopping by and sharing in the 2015 
Tim Holtz Tag Fun.
Feel Free to leave some "LOVE"

Sunday, June 14, 2015

BIRTHDAY TAG AND PHOTO FRAME

Birthday Tag

I have a close friend that I get together with as
often as I can and scrap.  We have sooo much fun in
the process.  She had a birthday during the month of
May while my oldest son was in the hospital.  Since I am
now able to play again, I decided to make her a tag and a little
photo frame to go along with her gift for her birthday.
I sure hope she likes it!


I love the way this tag came together.  I went through my 
scrap paper and pulled out paper that appealed to me.  I 
notice there is some Pink Paislee, an October Afternoon journal
card, some blue shimmer paper, white card stock 
and I see some Paper Studio, My Minds Eye, 
some glitter paper and even a scrap of my favorite paper
....CHART Paper!  
Then I looked through my dies and pulled out a few that I 
thought I could use on this tag.
It is for a birthday right??? You really need some
things such as balloons and candles.  
So here is a list of tools and product that helped 
me make this "BIRTHDAY TAG!"

Dies:
Sizzix Balloon Die - medium - 38-0147
Sizzix  Candles Die - 38-0151
Sizzix Multi Swirls Die - 38-0160
Sizzix Border Heart Die - 38-0159
 Punches:
Paper Studio - Heart Punch
Fiskars- Tiny Hand Heart Punch
 Other Supplies:
Chipboard
Making Memories Glitter Letters
Basic Grey Tiny Types
Colored Bling 
Black Wire Sheer Ribbon
Black Twine
Tim Holtz Stapler
Tim Holtz Walnut Distress Ink
Hero Arts Wood Stamp:  C4969 -
"you deserve the best day ever"
The tiny person came from a piece of
scrap paper from Teresa Collins Family Stories.
I just fussy cut it out and glued the glitter heart onto it.
I hand cut the banners .
Glue:
Beacons, Glossy Accents, and Pop Dots
One project done...and one to go....

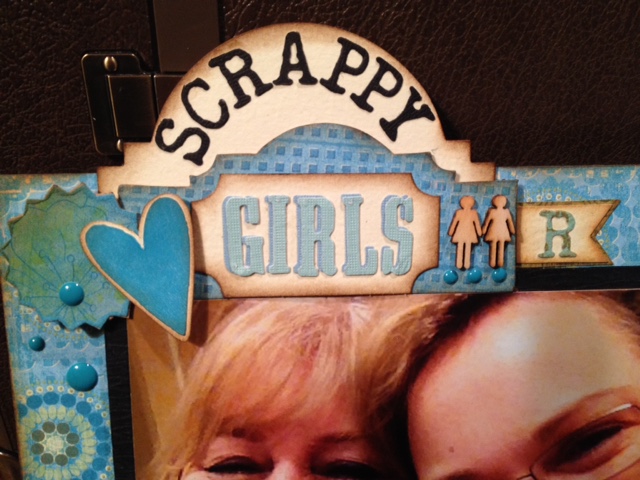
Now for the Photo Frame:

SCRAPPY GIRLS ARE HAPPY GIRLS


LOL...just looking at this photo brings back the fun time we
had scrappin' at a Teresa Collins event.  Oh Scrappin' makes
me sooo HAPPY!  
For this project I used scrap paper too!  I really like to save my
paper collections for mini books. That way when I work on a 
large book project, I know I don't have to search for paper that
matches....it's all there in the collection.
 
Scrap paper used in this project:
Black, light blue and medium blue, and pale lemon card stock,
Kelly Panacci Atomic Turquoise
Kelly Panacci Turquoise Mini Squares
Paper Studio Texture Turquoise
My Minds Eye So Sophie "Brothers and Sisters" Petite Blue Floral Paper
BEA104 Sea Foam
Chipboard
Dies:
TH Alterations - Styled Lables, Vintage Cabinet Card,
Mini Lovestruck, Typeset, and Wanted Alphabet
Studio Calico Wood Veneer
38 # 331180 and 63 # 331002
Brads - MME - 1 pearl brad from Lost & Found 2
Dots - Doodlebug Sprinkles -4010 Swimming Pool
TH - Tiny Types
Black Marker
Distress Ink - Antique Linen and Tea Dye
Punches:  Teresa Collins - 5254
Paper Studio 
We R Memory Keepers Chomper - Stub
 Glossy Accents
Glue-  Beacons, Teresa Collins  Xyron Mega Runner
Tombo Mono liquid glue 

I love how these two projects came out!  I sure hope my friend
likes them too!  Now the only thing left to do is to locate
the little black stand I bought to put the frame on!


Sunday, May 31, 2015

TIM HOLTZ May 2015 Tag

TIM'S May TAG
I can't believe I am able to make this post today.
My oldest son Will was in the hospital for over
3 weeks in this month...
(this is another story for another day).
I can't tell you how good it feels to be HOME!
So whenever I can, I sneak down to my happy place...
My special place where I lose ALL TRACK OF TIME!
AND PROBLEMS....
I feel so BLESSED to be able to create..I know I
have told you how happy it makes me...
So on to the topic of my post:
TIM's May Tag
I ABSOLUTELY LOVE creating vintage projects.
I have tons of family history projects just waiting for
me to work on!  This is my second love after working
on my own immediate family projects.
There were quite a few products missing from
my stash in order to create this tag. I didn't worry 
about it because I knew I wanted this project to have
special meaning for me!  I didn't want it to be a
"technique" tag.
I had this photo of my mom that has always been a favorite of
mine.  She had it made for my dad early in their relationship.
I already had it in my computer..so I just reduced the size and
printed it out for this project.  So now that I had my photo
ready, I just had to gather my embellies.
The only product that I used that was the same as Tim was 
the train and dance ticket, The TYPO Stencil and the base tag.  Everything else
is different.
You can check out the products Tim used on his tag and 
TIM'S May Tag on his blog from this link:
Here is my version of TIM'S May Tag:


Different Products I used:
Burlap Fabric for base
Art Extravagance Metallic Gold Crackle Paste
Crown Diamonds card - TH Ephemera Pack
Tattered Flower Garland Die - 667824
Bead Treasures Jewelry - Fairy Tale
art-i-cake: Charm (pink ball)
American Crafts DIY Shop -twine
DCWV Vintage Collector Epoxy Labels
Tim Holtz Idea-ology Label Letters
Ranger - Glossy Accents, Archival Ink - Jet Black
Tim Holtz - Distress Ink - Frayed Burlap
Stitching - Black Thread
Tim Holtz Distress Tool
Scrap Paper - Pale Pink
Beacons - 3-in-1 glue
 Stash:

Breast Cancer Pin
Clip Earring -this was my mom's
Ribbon - Shimmer Pale Pink
Bling
Brads
I am really excited with the way this tag
came together. 
I think my mom does "SPARKLE" in her photo...
She definitely looks  "HAPPY" here...
I don't think I will ever get tired of looking
at this tag..and I think she is going to love it....
But I am not going to give it to her...
 for now it is going on my board for 
my 2015 TIM HOLTZ Tags....
(I still have to do January's Tag....(LOL)
Thanks for visiting my Blog!


Thursday, May 7, 2015

Mother's Day Layout

BUTTERFLY KISSES

I knew Mother's Day was just around the corner and I knew I wanted
to make a couple of projects for my mom.  I ran across a couple of 
pictures of my mom blowing some kisses at me and I knew these 
would be perfect for a  layout to make for her!  
I had a friend share this layout of butterflies with me and
we planned on making it.... however...this layout ended
up inspiring me to make the layout of my mom.
Here is the inspirational layout:
Isn't this layout adorable?????
I thought so too!
A huge "Thank You" to Stacy Cohen for such a cute layout!
It is sooo creative.

Here is the Layout I made for my mother:


Here is a list of supplies I used for creating this Layout:

SUPPLIES USED:
Chipboard

Paper:

Paper Studio – Woven Natural Fibers

and Rose Petals

Pebbles – Country Picnic\Back Porch

Elle’s Studio – Saltwater\Memo

Echo Park – Creative Agenda\Checklists

Fancy Pants – Off to School\Measure Up

Heidi Swapp – Vintage Chic\Just Dots

Bo Bunny – Vintage & Double Dot\Passion Fruit

Cardstock – Variety of Pinks

Dies:

Spellbinders – Grand Nestabilities\Decorative Circles One

Tim Holtz – Flourish, labels, Inside Out, Typeset,

and Arrows

Sizzix – Framelit DieSet w\Stamp – Simply Lovely(#659527)

Punches:

Teresa Collins: Ampersand, Heart

Fiskars:  Scallop Boarder

We R Memory Keepers – Stub & ½ corner 
 Ink: Frayed Burlap,
Destress Stain: Burlap

Washi Tape - Teresa Collins

Stamps: Speckles, Textures
Other:

Glossy Accents

Noted Sticker: MME Collectable

Tiny Types

Pink Bling - Recollections

 Journal Card – from stash
 Tim Holtz - Paper Destresser Tool

I still need to purchase the stand that I am going to set 
the layout on.  I am not going to put in in a book.
I made sure to double up on the chipboard to
support the paper so it would be sure to stand
upright on a photo stand.

I sure hope my mom loves this layout.  She always wants
to hug and give you kisses.  I think the pictures show her
fun and loving personality.
It is a very natural picture of her, we took it while having our
morning coffee, so even though she doesn't have
any makeup on I treasure the "LOVE" I see in her.

Thanks for stopping by and I hope you enjoyed your visit to my blog. 
 I love sharing 
EVERYTHING about scrapbooking.


Thursday, April 30, 2015

Tim Holtz April Tags of 2015


Above are my April 2015 Tim Holtz tags.
You can check out Tim's April 2015 tags on his blog at:
When I first glimpsed Tim's tags for April, I was again blown 
away by the creativity, you know, his ability to come up with the ideas,
execute the techniques, and then to explain it so simply that I 
can actually try to recreate it.  I could actually see these flowers 
made larger, put in a frame, and placed on a wall in a room in my 
house.
I fell in love with his "NEW" dies....I gotta have them..
don't you....
O K back to the tags.....
I changed a few things on my tags....I am after all a girl, and well
I like some shimmer and bling every now and them.
When using the watercolors on the flowers, I just had to add some 
Glam shimmer paint.  When the light hits the flower, you can see
it shimmer.  My photos didn't do a good job picking that up.  
But I know it's there..."GIRLY" stuff!
I also added a bling to the dot of the i and added Glam 
paint to make it and the star pink. For the tag I added gold alcohol ink to the
dot of the i and the star.....YES....creating every day makes me 
so happy....I am so GRATEFUL for Tim Holtz...such an
inspiring teacher....I never get tired of learning from him.
Oh this year is going by way too fast......
Thank you for visiting!!!
.