Translate

Wednesday, December 28, 2016

TIM HOTZ DECEMBER TAG 2016

Tim Holtz December Tag 2016

 It's FINALLY arrived!  The last of the 2016 
Tim Holtz Tags!
I really can't believe that the end of 2016 is here.
Making these tags every month has been such a 
FUN, LEARNING, CREATIVE JOURNEY for me!
I absolutely LOVE creating these tags, sharing and learning along
with so many crafters.
Sooooo THANK YOU Tim Holtz and Mario for keeping
this creative avenue alive!  
YOU ARE APPRECIATED!

Follow this link to see how Tim created his tag:

My girlfriend and I were actually able to work on 
this tag together...not by SKYPING, but phiscally
sitting at a table together...Soooo much fun
creating with her!
Here is the tag we created together:


 When I saw Tim's new Deer Die:
DASHING DEER....I fell in love with it.
What a Perfect time of year to create with this
Lovely Fellow!


I loved making this Dec Tag with this handsome guy...
Maybe Tim will make a die and give him
a body.  I will make a "WISH" for that!

Next thing I knew I got some HAPPY MAIL!!!!


 WHOO HOO...For being a NOVEMBER TAG WINNER!
I decided to put all Holiday decorating on the back
burner and make another tag.

Tag #2 for DECEMBER coming at you...


HO HO HO 
Santa has arrived!

I hope everyone had a very
HAPPY HOLIDAY!

 Thank you for taking the time to visit!
Hope to create with you in 2017!

Feel Free to leave some "SCRAPPY LOVE!"


Thursday, December 8, 2016

HERO ARTS BLOG HOP

Hero Arts Blog Hop

Do you like blog hops????
If you do ....you need to check this one out!!!

You will find out all about Hero Arts  release for the new
2017 Valentine's Collection! 
Plus you will get lots of great ideas 
and inspiration!
AND....it is FUN!!!!!
(Did I mention there's a GIVEAWAY?)

Thursday, November 10, 2016

TIM HOLTZ 2016 NOVEMBER TAG

Tim Holtz 2016 November Tag

I just can't believe November is already here...
One more month, one more tag and we will
be in a new year.....
Unbelievable!!!!
The morning air has a lovely chill to it and 
the leaves are turning....
FALL is HERE....FINALLY!!!!
My favorite time of the year!!!!!
(When it feels like it) LOL!
Thanksgiving is around the corner....
So much happening this time of year and
so little time to squeeze everything in.

But I will always make time for creating.
It soooooths my soul.
Check out Tim's tag for this month:
I love the topic of this month's tag....the thought of Fall
and Thanksgiving with Families traveling all over 
to GATHER TOGETHER!
If you would like to check out the directions to Tim's
tag...Just follow the link to his blog....
As always, Tim is gracious with his knowledge and
he will show you exactly how he created his tag.
I grew up in a large family....camping in the Smokeys
and getting together with cousins....These ended up
being really large gatherings ... 
Sooooo I couldn't resist putting together a tag
with MORE leaves.....
I have to have more....
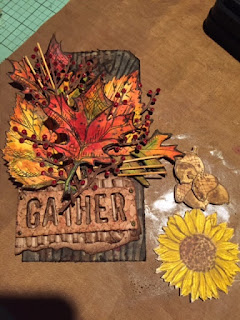
Here is my 2016 November Tag:
I have always been a lover of trees ...
I got this natural love of the woods from
my father.  For this tag, I just pictured 
what I would love to gather from the woods...
leaves, flowers, berries, acorns and some twigs and
then you have all this beautiful color that looks good
no matter how you gather it.  (at least that is how
my mind sees it)
For my tag my theme is the same as Tim's and my title is 
made like his....I made more than one leaf, 
but I water colored  them with distress ink instead 
of the distress markers. Everything else is different.
(I know...I didn't put any rubons on the back ground...
but there really wasn't room).
When I begin a project....I have to "GATHER"
EVERYTHING that I think I might need.
Sometimes this creates a large mess, but I just don't want to 
forget anything...for me it is all in the DETAILS! 
Clean up between each projects is a must.
Everything has to go back to it's "HOME."
If I have more than one project going on ...I'll put 
the supplies and project into a basket until I can get back to it.
I had two other projects underway when I began this tag.
I became very involved in the creation of this tag and 
couldn't wait to finish.
I think if you look closely at the tag, you can probably
figure out what I did...and if you can't, and have a 
question...all you have to do is ask and I will answer back!
(This is not a test...Ha Ha)!
I started by embossing the tag with a 
wood grain design and then using
Pumice, Hickory Smoke, Walnut, Vintage
Photo, Mahogany, and Espresso Distress Stains
to color the back ground of this tag...I used Tim's distress
tool on the edges of the tag and then inked the edges.
In the end...you can't see much of it, but I really wanted 
to create a lot of layers for the base of this tag.
I put the lighter colors on first and then I inked
some of the darker color onto the raised portion of
the embossed design to create some depth.
You can see the tag background in a photo 
later on.
I then created my title. 
 I have found that when working with small parts, 
it is very helpful to put these small pieces in a tray.
I constantly drop these little pieces.....some of them are
never to be found again!!!! (I have no idea where they
disappear to)!
.
I used Distress Walnut Stain Marker
to ink the inside of the letters on the title so 
they would show up more.  I used WALNUT DISTRESS
INK to DISTRESS EVERYTHING!!!
I saved the inside of the
A and R and added them inside the letter.

Now for the leaves.....
I stamped these images onto Tim's watercolor paper.
Using his distress ink, I water colored all
the leaves.

I cut all these out and began placing my pieces onto the tag
to get a feel for their placement.

Here are some other dies that I got out.
 I used the IO Fern Leaf, Elizabeth Craft Berries,
and the Pretty Pink Posh Balloon String  (for the twigs) dies.
 I cut the berries out of brown scrap cardstock and 
used red Stickles on the berries.
I cut the twigs out of manila folder and 
inked them using Vintage Photo and Walnut Stain.
I used two sunflowers and layered one on top
of the other for more depth.  The sunflower
and acorns were made from stamps.
I watercolored the images, cut them out and
inked them. I cut some of the petals on the sunflower
and inked around the edges of the cut.
I glued all the parts onto the tag. Next I made the word
"TOGETHER" in a word document and cut that out,
backed it with cardstock and inked each part.
I then used Candy Apple, Carved Pumpkin,  Mustard Seed, 
and Brass Distress Spray Stain on the ribbon.
I also used some twine near the title.
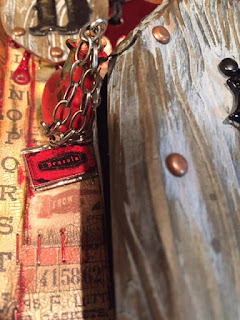
Below is the Acorn Charm I used along with
Tim's Token: Traditions which I attached using
one of Tim's loop pins.


Thank you for taking the time to visit my 
blog.  I hope each and everyone of you 
have a very Blessed Thanksgiving.
Feel Free to Leave some 
"SCRAPPY LOVE!"
Mylissa


Monday, October 17, 2016

TIM HOLTZ OCTOBER 2016 TAG

Tim Holtz October 2016 Tag

Here it is ....Tim's Tag...
Would you just look at this tag ....How FABULOUS it is!
Tim is like "James Bond"....
NOBODY does it BETTER!
Check out all the detail ....Tim thinks of
EVERYTHING!
I love this tag!
Here is the link to Tim's tag if you would like to make it:

So this month I SKYPED with my girlfriend to make this 
October tag. If we can't get together....we can SKYPE....the next best thing.... right!!!!
This month we were able to plan our tag because we traveled to see a girlfriend 
to create a special project. A SCRAPPY WEEKEND...GIRLTIME....
THE BEST FUN!
We were hoping to make this tag when we were together, but we made
something REALLY SPECIAL..and didn't have time.  
I am going to post that later....can't WAIT to SHARE!!!!!! 
Sooo we at least purchased a few things for our tag....after a few
visits to Hobby Lobby, Michaels, and Tuesday Morning!
Nothing like shopping for inspiration ...RIGHT!!!!! LOVE!!!!

HERE'S My OCTOBER TAG:
(This casket would have been really cool with the
Riveted Metal Texture Fade ....boo hoo..
.I don't have that one yet...so the wood will have to do)
There are three birthdays in my family in 
October.... (two right on Halloween) so I
couldn't resist a Dracula theme tag.  It brings back the memories of 
watching DARK SHADOWS when I came home from school!
 (Telling my age here...LOL)
So for my tag...I kept to Tim's directions for the back ground,
but that is where our similarities stopped. 
I made the back ground first....I used a few different
background pieces...like some dictionary
prints....the letters and the definition for vampire.
Everything was distressed Tim style
with Walnut Distress Ink and Paint.
I also used Candy Apple Red Paint, I poured this 
into the bottle so it would look like BLOOD....and a 
Red Sharpie for edging.
I think one of the COOLEST products Tim has out now is the 
Distress Collage Medium Crazing.  This stuff is amazing and 
makes the most wonderful teeny, tiny cracks on your paper as it
dries.  Don't be afraid to use a heavy application.
(Tim suggests applying it with your finger)
You can see the tiny cracks in the photo above.
LoVe, lOvE, LOVE this product.
Here are a few more close up photos of
my October Tag!


Hobby Lobby Embellishments:
Fairy Tale Jewelry charms- daggers, bottles, bats and books
Hemp Twine- Black
Michaels:
Recollections- Ravenshead Manor (wine dripping)
All other products were Tim Holtz
Other Multi Medium used were Distress Paint:
Weathered Wood and Walnut Stain.
This really puts me in the mood for
HALLOWEEEEEEEEEEEN!

Thank you for taking the time to visit my blog.
Feel Free to leave some "SCRAPPY LOVE!"


Artists Printer Trays

A Great Idea

My first project using the 7 Gypsies Printer Trays was
for my mother in law's 90th Birthday.
You can check out that project by following
I really fell in love with these trays because
of their versatility and you can add so much 
detail to them which provides a cute decor 
project to a shelf or cabinet in your home.

The year after my father passed away,
my mother planned a Christmas in the Smokey Mountains.
I am not one that likes being away from home
during the holidays, but my father always loved
the Smoky Mountains and this is what my mother 
wanted to do for the holidays so .....I went for her...
knowing that my entire family wasn't going to be able to go. 
I decided I would plan a project to give to every family that went.
I have three brothers and a sister, and my mom and of course I had to 
have one too! 
I thought that since this was for the holidays...there would be lots 
of pictures taken.....and you can put quite a few favorite photos in 
these trays...so that is how this idea came about...another tray project.
.......Times 6.....

 This project brought me so much joy.  I ended up
giving my tray to my nephew and his wife who ended up coming
to the mountains for a few days.  I had already made them a
"FAVORITES" mini book, but they both really loved the tray....
I can always make another one for myself...
(a project for another day).
The paper, bells, and ribbon and the small wreath all came
from the Paper Studio Collections at Hobby Lobby.
The small bear is just an image I got on line and
mounted on chipboard.  Everything else is either handmade
or a Tim Holtz or Sizzix die.  The snow on the embellishments
 is Ranger Adirondack Snow Cap acrylic paint.
 Here are a few close ups of the projects progress.
I began by making my embellishments.  I wanted to 
have everything made so all I would have to do is glue
the embellishments on when I was ready for them.


This Christmas Tray was a big hit!   Everyone loved their gift
and I feel so proud when I visit my sibilings homes and my mom's house
and see their trays sitting out with photos from that special Christmas.
And.....Yes, I ended up
adding pictures to my mom's tray for her.  

This next tray is not one of my designs, however,
I have to tell you that I am really TERRIBLE about
following directions on a project.......especially if I feel
as if it doesn't apply to me. Don't ever be afraid to change
a design if it doesn't work for you. 
As you look at the directions, you can see this project was designed
for a couple with one child...I have two boys...both grown,
so I changed it to fit my needs.  

   I went shopping at Archivers,
there use to be a store near me, with some
girlfriends and we found their tray project and of course 
purchased it.  
 Archivers Wall Art:
My completed tray:

(OOPSIES....so sorry for the glare in the middle of this)
Here are a few close up photos of my project:


If you look closely at the directions, you can 
see I didn't use all of the embellishments provided.
I will use them in another project some day in
the future.  LOL!!!!

There are many different sizes of trays available 
for purchase.  This tray is the one that came in my kit.
If you notice my photos didn't fit in the sections 
perfectly...they were too large.  I ended up measuring
them and then very carefully cut them to where 
they fit in the section right next to each other.
The most important fact to remember when doing
this is to not cut someone's face in half. 

I also used Tim's thinlits Shape Strip die (hearts).
This die is sooo versatile..I love all the little designs.
Perfect details for small places.

The paper provided in this project was by Simple
Stories, Documented.
I love this paper line and was so excited to realize I had some of it.
I actually needed to use some of it for the background.
One of the quotes I wanted to use was too large, soooo
I just made my own to fit my needs.
I love how this tray turned out and I have it
sitting on a cabinet in my kitchen where I can look at
it and ENJOY IT EVERY DAY! 
 That is what this "SCRAPPY WORLD" of ours
is all about....Creating and Sharing our memories!

Thank you for visiting my blog.
Feel FREE to leave some SCRAPPY LoVe!