Tim Holtz 2016 April Tag

Here is the link to Tim's birdie directions...if you want to
follow along to make one like Tim.
I can't believe this month is over and I am rushing
to post my tag. I got together with my girlfriend,
who LOVES to create tags as much as I do, at the
beginning of the month to create this months tag.
It has been soooo crazy at my house that
I am just now getting around to posting this.
I liked this months tag simply because I LOVE BIRDS
...and I looked forward to learning how to do something new.
That is one of the things that Tim's inspires in me...
That is one of the things that Tim's inspires in me...
and gets me excited about creating.
My girlfriend and I had FUN creating this
tag and deciding what products we could use to get the
"LOOK" of Tim's tag.
We were unsure of this new process so we decided to
stick close to Tim's design.
We were unsure of this new process so we decided to
stick close to Tim's design.
Soooo Here's My Tag(s)

Cut out your birds using chipboard.
I meant to have them facing each other
but I got caught up in the creating process
that I forgot...LOL!

I did not have the Distress Paper Mosaic Kit.
We decided to just use some Teresa Collins Modeling
Paste instead.


I thought this process was really fun.....
and as Tim said...kind of therapeutic....cutting
up little bits of paper and gluing them on.
(I used all scrap paper for both of my birdies).
It doesn't take much.

I also didn't have Tim's wood grain paper,
so we made some by using the Teresa Collin's
wood grain embossing folder and then I used
the antique linen paint on the base just as Tim
did. I then used some distress stain and ink
for my wood grain colors.


I then distressed the edges and inked them.
Now for the tags. I only put color on the
top part of the tags when I noticed that the
rest of the tag wasn't going to show.


I always LOVE making this distressed look!
I never get tired of it.

Glue the wood grain on top of the tags.
then ink the tags.
Now it's time to put my birdies on the tags
and embellish them.


I decided to use the heart charms instead of the
number tokens to dangle off of the arrows.
(I think I ended up using Hobby Lobby's
Paper Studio's brand of arrows or Maya Road).
Then I made my own ticket at the top using a
stamped image (Fiskars Teresa Collins Noteworthy
stamps) instead of using vial labels.
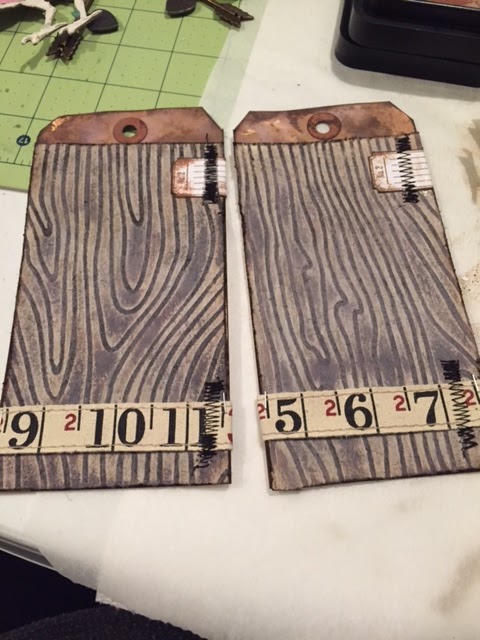
Stitch the ticket at the top and also
stitch the ruler ribbon on the bottom on
the right side and on the staple the
ribbon on the left side.
the right side and on the staple the
ribbon on the left side.
Oopsies...I have a lead foot today...
Really heavy on the zig zag design...
I didn't pull it through the sewing machine
fast enough. I still love the stitching and
the extra layer of dimension it adds to the tag.
This is starting to look really cool as it comes together.

I chose thread to tie the hearts onto
the arrows. The holes on the hearts are tiny
so it worked out PERFECTLY and I love
the extra pop of color it added.
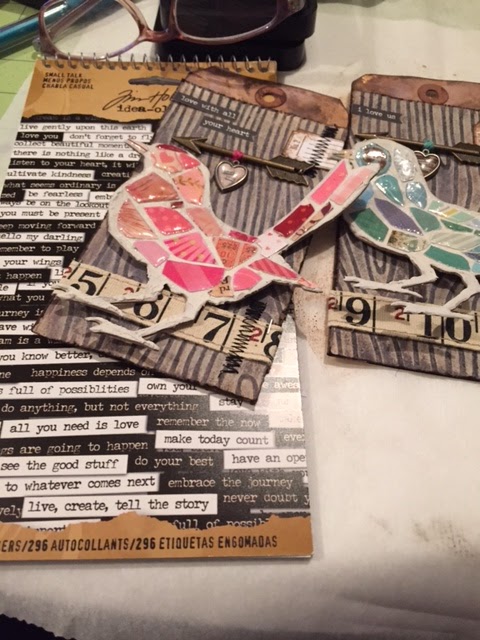
Now to choose my sentiments and add my stars.
I also added a sentiment to my ticket at the top.

I didn't have my alcohol ink with me so I just left
the star natural.
Oh...I just love them.....Glue on the birdies...and
now its time for the ribbon.
Yep a blue one and a pink one.


TWEET TWEET....now aren't these SWEET!!!!!
My girlfriend and I got to play for
FIVE days straight...
uninterrupted ....
For REAL!!!
Thanks for stopping by and
feel free to leave some LOVE!