Tim Holtz 2016 May Tag
It's TAG TIME

Tim's Tag is soooo BEAUTIFUL.
Here is the link to Tim's tag and the directions on how
to create it:
However... I didn't have this stamp or the spoon or the
TinyTattered Florals die. I have lots of
stamps, but I am not into buying images of people.
So I knew I would really have to think about what I was
going to do with this month's tag. I didn't really want to
do another photo tag of my mom...I already have several
of those....MMMMMMmmmmm what to dooo????
Going through my stamps really helped me here.
I found this one stamp that I had purchased that
had this beautiful child's face on it. Yep...it's what I am going with.
Here is my Month of May Tag.
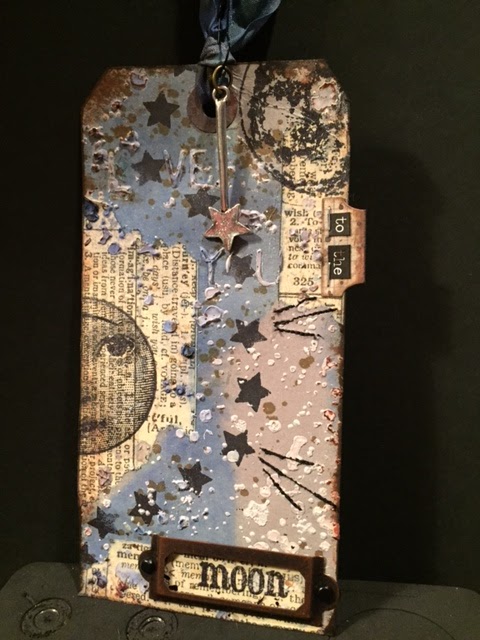
You are right ....this tag has NOTHING to do with
the month of May... I just went with the
creative spirit.
See the beautiful child's face on the stamp....

When I was making this tag...I had no idea what the name
of this stamp was. I thought....this is so sweet and the face is so round
like the moon....I thought...."Love you to the moon and back"....
I looked at it and it made me think of another
stamp set I had which I will share with you further into this post.
I really had to stop thinking about Tim's pretty tag so I could
focus on creating something totally different.
So following Tim's directions I applied my washi tape.

Here's the To The Moon stamp set. I purchased this awhile back
from Simon Says Stamp. I partially stamped the images onto
the tag with Ranger Archival Black Ink AIP06633.

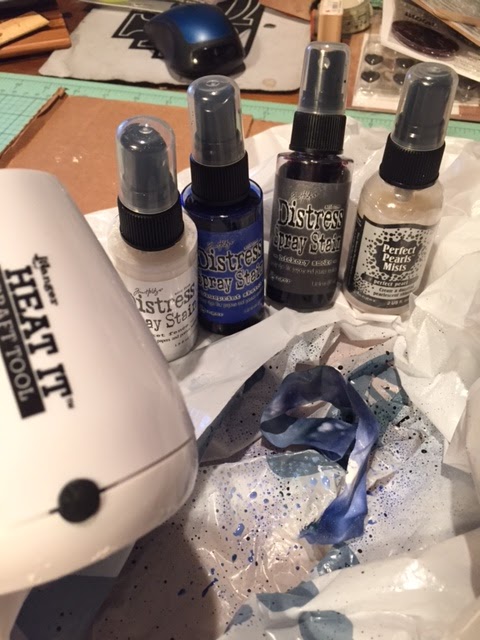
Now to apply the modeling paste.
It doesn't take much.


the modeling paste went through
the SPECKELS stencil.
The distress ink colors were an easy choice.
Sticking to blue, pumice stone and
some white!
The distress ink colors were an easy choice.
Sticking to blue, pumice stone and
some white!
Today I was being really lazy. I just took a large bag and
set my tag in there to spray... I may do this again. I had
enough ink left in the bag to put my ribbon in there and get it all inky.
I do not like to waste my colors. LOL!


Ohhhhhh....it's looking soooo Pretty!


Here are the colors I used.

Let's dry this baby....

Does this have the look of the moon surface...
I have never been there but I have heard of a
"BLUE" moon.

Lots of little ink drops still in this bag.
Just enough for my Tim Holtz Crinkle Ribbon.
Time for the final embellishments.

A little charm to dangle from the ribbon.
A label for the word moon.

Some distress ink for the edges and
a few stitches on the sewing machine to look
like shooting stars.
 A tiny tab for Tim's Tiny Types "to the"
a few stitches on the sewing machine to look
like shooting stars.

(black and white).

I cut the tab out of paper scraps.

(I was tooo lazy to even get out my mat...
I just used some old chipboard)
Time for a little more ink spray.
I just unscrewed the top and shook the straw
part of the sprayer over the tag.
I really like the way this "DROPS" onto
the tag.
I just used some old chipboard)
Time for a little more ink spray.
I just unscrewed the top and shook the straw
part of the sprayer over the tag.
I really like the way this "DROPS" onto
the tag.
I blotted the excess off of the washi tape.
Ta Da.....ALLL DONE.
Can you still read it????
LOVE YOU to the MOON!


 I was trying to get the pretty shimmer in this photo.


Here's my "MOON" Tag for the month
of May.
Hope you liked it!
Thanks for stopping by and leave some
"LOVE" if you want!


