WAITING ON YUPO
I am soooo excited to try this new
product. It's called YUPO.
Tim says it's synthetic...a plastic...
and I will tell you after watching his video
in Creative Chemistry 103, that this
product will WOW you when you
use the alcohol inks with it!
I am sitting on pins and needles waiting for
my YUPO product to arrive.
Anyway, I decided that I would just
create one tag for Day 5 with Glossy Paper
and then repeat it again on Yupo when it arrives.
Alcohol Ink Stamped on Glossy Paper
Check out this background....

GORGEOUS.....
soooo sad my stamp slipped and this is all you
are going to see of this BEAUTIFUL background.


This is pretty, but if I had just added some
more BLUE...I would have had similar results.
Tag #1 - Alcohol Ink Stamped Resist on Yupo


This technique is really fun.....as I think all
the lessons with alcohol ink will be.
So you apply alcohol inks and the Blending Solution onto
your applicator tool, and dab it all over your Yupo.
Keep applying until you like your background.
Let this dry.
Stamp your image with Archival ink......
your applicator tool, and dab it all over your Yupo.
Keep applying until you like your background.
Let this dry.
Stamp your image with Archival ink......
be ready with your towel to wipe off the ink.
And TA DA...like magic there is kind of this
And TA DA...like magic there is kind of this
ghost image left. FABULOUS FUN!
My Yupo product has arrived!
Tag #2 _Alcohol Ink Faded Layers on Yupo


This technique is a lot of fun and reminds me of the techniques used in
Art Journaling.
Begin adding your layers of color of alcohol inks.
.(Let these layers dry).
Put some blending solution onto your mat and
gently work the solution onto your round blending tool foam....
(Making sure you apply just enough to wet the foam).
Next take a stencil and lay it on your project where you
want the design.
Take your round blending tool with blending
solution applied to it and gently remove the color.
I really like this technique.
Tag #3 - Texture Resist on Yupo


Using alcohol inks make your background.
Next pick an embossing folder to emboss with.
In order for this technique to work, this next step is important.
When embossing make sure the image is going to be pushed up through
the paper...(you want to be able to feel the raised image on the colored side of the paper).
Ink the raised surface with Archival ink and then immediately wipe away the ink
with a dry cloth. You can work in small areas of the embossed image at a time.
As you can see from the tag, the embossed image appears after you wipe
away the ink.....LoVe this technique!
Tag #4 Alcohol Ink Painting
You can make a very pale background and stamp your
image using a light color of Archival ink before you begin painting.
I went online and found an image to guide me and
just painted it without stamping.

Pink Daisy
Here is my Alcohol Ink Painting on YUPO.


I found painting with Alcohol inks fun. Once you figure out how they work
(they dry fast...but you just rewet the ink with blending solution), I think the inks
make them another great product to paint with.
Tag #5 - Alcohol Ink Liquid Landscape on Yupo
I found this technique interesting...but I was very hesitant and leery
of this entire process. But once you go with it and just allow yourself
to play and not worry so much about the outcome...I found I
liked my end result. You just move the alcohol inks around
(you can use a straw or popsicle stick or some smooth tool on
the surface) and try to achieve a landscape design.
Pretty cool.....and I fell in Love with it after I stamped
the pine trees on it.


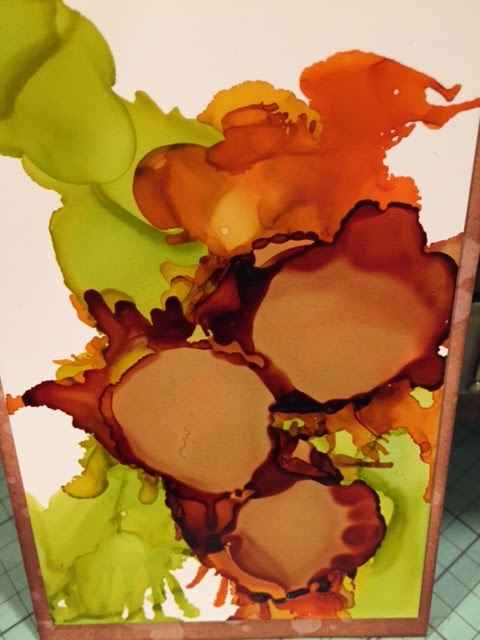
Tag #6 - Alcohol Ink Splattered Florals on Yupo
This was another technique that
I was hesitant about trying.
I just didn't see the purpose.
So I decided.... well this is suppose to be FUN!
And that is what I tried to do ...HAVE FUN!!!!
Apply Alcohol inks directly to Yupo.
Apply blending solution, and then blast the ink
with air using a straw or canned air.
I just used the Distress Marker Spritzer for
this technique....I didn't have a can of air
or a straw on hand.


This is the final lesson from
Creative Chemistry 103.
I have learned a great deal and
had a lot of fun using products and techniques
that I haven't used before.
Thank you Tim Holtz,
and
for a FABULOUS CLASS!!!!!
My Yupo arrives tomorrow. The wait is not making me happy at all!
ReplyDeleteLove your tag. That's a gorgeous peacock and the background is lovely! I feel your pain with the stamp mishap... Hate it when that happens! x
Sammy....Looks like my Yupo will arrive Monday at the earliest....Can't wait to see what you do when yours arrives!!!! I am looking forward to seeing the magic happen with this specialty product! Thanks for stopping by and leaving some Crafty Love!!!! Until then....
DeleteHappy Crafting!!!!