Translate

Saturday, February 29, 2020

Life


Hello Crafters....

Life can certainly interfere with CREATIVITY TIME!

#1:  In May of 2018 we helped our youngest son and his
family purchase a home and move.
#2: In June we began the task of preparing our home to
sell. Time to downsize and move back home.
 (My husband and I have been married for over 30
years).   You can just imagine all the things you collect
over that time period.  So this task consisted of not only
home repairs (we have lived in our home for 13 years) but
also getting rid of a lot of "STUFF!" For me it was actually
embarrassing to have to walk my realtor through our home....
especially the basement.  There was a huge room in the
basement that was just full of  "STUFF!"  We had broken
down two relatives homes and many items ended up in
the basement...along with our things. It  was up to me to
clean all this out...but you know it had to be done and I was
up for the challenge.  I made a list and stuck to it.  Needless to
say, I marked off everything on that list and it felt soooo Good!
#3 House went on the market in Aug. of 2018.
#4 We bought a new home and began moving things from our
current home to our new home. Yep we moved everything
ourselves except for the heavy furniture. (I would never
 recommend anyone in their 60's to do what we did).
#5 In Nov. of 2018 we got a contract on our home.
#6 We completely moved everything out of our home in
preparation for the new owners by the end of the year.
#7 Our home sold in mid Jan of 2019.  HOORAY!
#8 Now to get settled in our new home.

Our NEW HOME !!!!

(Every chance I got, I would work on my scrap room).  
For the first time I actually had a room with lighting,
 electricity, and heat/air.
My room even had and attached bathroom. I felt like a 
QUEEN!!!!
By Spring, I felt organized enough that I could begin
scrapbooking again.  It had been over one year since I 
had created.  
The first things that I created were some Tim Holtz tags.
That is all I needed to get my groove back was to have
some guidance from the master.  It feels soooo
MARVELOUS to be creating again.
I will share some of my creativity in my next post.


Friday, February 3, 2017

TIM HOLTZ SEPTEMBER 2014 TAG

Tim Holtz September 2014 Tag


Here is Tim's Tag for SEPTEMBER 2014!

That's right today is Friday, February 3, 2017 and Tim's tag is from another year! 
If you want to try to create Tim's tag, you can find his
direction and supplies that he used on his blog by following the link:

I just couldn't stop creating tags!
 I decided that at least once a month I would still TRY
to create a tag from Tim that I haven't made yet.
There are sooo many tags that I haven't made that I 
should be "Scrappy Happy" for a LONG TIME!

Here is my tag:
I love how this tag turned out...
I have always wanted to create Tim's tag from
September 2014.  It is sooo stunning.
My girlfriend and I got together over Skype
and came up with this tag.
We decided since we didn't have the stamp 
that Tim used...we would just use a 
photo of ourselves.....
Mmmm which one to choose?


I left my background alone in my design 
because my photo is not a side view.
The other thing that I did differently is
I chose distress ink colors
 to see if I could get the 
distress inks to look as vibrant as 
the alcohol inks Tim used.
I wanted to go for an ombre look ...
something I will definitely do again.
Ombré /ˈɒmbr/ (literally "shaded" in French) 
is the gradual blending of one color hue to another.
I thought the writing on the stamp that Tim used
worked really well on top of the colors. So I found
one of Tim's stamps (not actually his - LOL)
that I could use for my butterflies.

I then used Martha Steward butterfly punches
because I did not own the Butterfly Frenzy die.
These punches worked just fine for this project.
Just punch and glue. (Plus a little crimping).

 
 Then I picked out quotes from the rubbings
(sometimes you have to piece words together - 
that can take lots of patience).
I thought a word at the bottom would look alright
since I couldn't find the word I needed from the
rubbings.  I could have used stickers or even die
cuts, but I think the white embossing at the bottom 
over the black tag made the word really pop.

I then picked out some pretty ribbon for the
topper and glued a butterfly with some bling by the word 
at the base of the tag....
I think the color on this tag says it all...it didn't need any
metal or other embellishments...
Just simple beauty!
Thanks Tim ....for the inspiration!!!!

Thank you for visiting my blog!
Feel free to leave some scrappy love....


Saturday, January 28, 2017

FUNKIE JUNKIE JANUARY GIVEAWAY

Funkie Junkie Giveaway

Head over to The Funkie Junkie Boutique Blog ASAP to enter their Giveaway!!!

Wednesday, December 28, 2016

TIM HOTZ DECEMBER TAG 2016

Tim Holtz December Tag 2016

 It's FINALLY arrived!  The last of the 2016 
Tim Holtz Tags!
I really can't believe that the end of 2016 is here.
Making these tags every month has been such a 
FUN, LEARNING, CREATIVE JOURNEY for me!
I absolutely LOVE creating these tags, sharing and learning along
with so many crafters.
Sooooo THANK YOU Tim Holtz and Mario for keeping
this creative avenue alive!  
YOU ARE APPRECIATED!

Follow this link to see how Tim created his tag:

My girlfriend and I were actually able to work on 
this tag together...not by SKYPING, but phiscally
sitting at a table together...Soooo much fun
creating with her!
Here is the tag we created together:


 When I saw Tim's new Deer Die:
DASHING DEER....I fell in love with it.
What a Perfect time of year to create with this
Lovely Fellow!


I loved making this Dec Tag with this handsome guy...
Maybe Tim will make a die and give him
a body.  I will make a "WISH" for that!

Next thing I knew I got some HAPPY MAIL!!!!


 WHOO HOO...For being a NOVEMBER TAG WINNER!
I decided to put all Holiday decorating on the back
burner and make another tag.

Tag #2 for DECEMBER coming at you...


HO HO HO 
Santa has arrived!

I hope everyone had a very
HAPPY HOLIDAY!

 Thank you for taking the time to visit!
Hope to create with you in 2017!

Feel Free to leave some "SCRAPPY LOVE!"


Thursday, December 8, 2016

HERO ARTS BLOG HOP

Hero Arts Blog Hop

Do you like blog hops????
If you do ....you need to check this one out!!!

You will find out all about Hero Arts  release for the new
2017 Valentine's Collection! 
Plus you will get lots of great ideas 
and inspiration!
AND....it is FUN!!!!!
(Did I mention there's a GIVEAWAY?)

Thursday, November 10, 2016

TIM HOLTZ 2016 NOVEMBER TAG

Tim Holtz 2016 November Tag

I just can't believe November is already here...
One more month, one more tag and we will
be in a new year.....
Unbelievable!!!!
The morning air has a lovely chill to it and 
the leaves are turning....
FALL is HERE....FINALLY!!!!
My favorite time of the year!!!!!
(When it feels like it) LOL!
Thanksgiving is around the corner....
So much happening this time of year and
so little time to squeeze everything in.

But I will always make time for creating.
It soooooths my soul.
Check out Tim's tag for this month:
I love the topic of this month's tag....the thought of Fall
and Thanksgiving with Families traveling all over 
to GATHER TOGETHER!
If you would like to check out the directions to Tim's
tag...Just follow the link to his blog....
As always, Tim is gracious with his knowledge and
he will show you exactly how he created his tag.
I grew up in a large family....camping in the Smokeys
and getting together with cousins....These ended up
being really large gatherings ... 
Sooooo I couldn't resist putting together a tag
with MORE leaves.....
I have to have more....
Here is my 2016 November Tag:
I have always been a lover of trees ...
I got this natural love of the woods from
my father.  For this tag, I just pictured 
what I would love to gather from the woods...
leaves, flowers, berries, acorns and some twigs and
then you have all this beautiful color that looks good
no matter how you gather it.  (at least that is how
my mind sees it)
For my tag my theme is the same as Tim's and my title is 
made like his....I made more than one leaf, 
but I water colored  them with distress ink instead 
of the distress markers. Everything else is different.
(I know...I didn't put any rubons on the back ground...
but there really wasn't room).
When I begin a project....I have to "GATHER"
EVERYTHING that I think I might need.
Sometimes this creates a large mess, but I just don't want to 
forget anything...for me it is all in the DETAILS! 
Clean up between each projects is a must.
Everything has to go back to it's "HOME."
If I have more than one project going on ...I'll put 
the supplies and project into a basket until I can get back to it.
I had two other projects underway when I began this tag.
I became very involved in the creation of this tag and 
couldn't wait to finish.
I think if you look closely at the tag, you can probably
figure out what I did...and if you can't, and have a 
question...all you have to do is ask and I will answer back!
(This is not a test...Ha Ha)!
I started by embossing the tag with a 
wood grain design and then using
Pumice, Hickory Smoke, Walnut, Vintage
Photo, Mahogany, and Espresso Distress Stains
to color the back ground of this tag...I used Tim's distress
tool on the edges of the tag and then inked the edges.
In the end...you can't see much of it, but I really wanted 
to create a lot of layers for the base of this tag.
I put the lighter colors on first and then I inked
some of the darker color onto the raised portion of
the embossed design to create some depth.
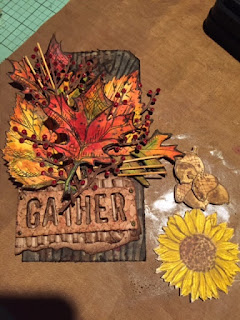
You can see the tag background in a photo 
later on.
I then created my title. 
 I have found that when working with small parts, 
it is very helpful to put these small pieces in a tray.
I constantly drop these little pieces.....some of them are
never to be found again!!!! (I have no idea where they
disappear to)!
.
I used Distress Walnut Stain Marker
to ink the inside of the letters on the title so 
they would show up more.  I used WALNUT DISTRESS
INK to DISTRESS EVERYTHING!!!
I saved the inside of the
A and R and added them inside the letter.

Now for the leaves.....
I stamped these images onto Tim's watercolor paper.
Using his distress ink, I water colored all
the leaves.

I cut all these out and began placing my pieces onto the tag
to get a feel for their placement.

Here are some other dies that I got out.
 I used the IO Fern Leaf, Elizabeth Craft Berries,
and the Pretty Pink Posh Balloon String  (for the twigs) dies.
 I cut the berries out of brown scrap cardstock and 
used red Stickles on the berries.
I cut the twigs out of manila folder and 
inked them using Vintage Photo and Walnut Stain.
I used two sunflowers and layered one on top
of the other for more depth.  The sunflower
and acorns were made from stamps.
I watercolored the images, cut them out and
inked them. I cut some of the petals on the sunflower
and inked around the edges of the cut.
I glued all the parts onto the tag. Next I made the word
"TOGETHER" in a word document and cut that out,
backed it with cardstock and inked each part.
I then used Candy Apple, Carved Pumpkin,  Mustard Seed, 
and Brass Distress Spray Stain on the ribbon.
I also used some twine near the title.
Below is the Acorn Charm I used along with
Tim's Token: Traditions which I attached using
one of Tim's loop pins.


Thank you for taking the time to visit my 
blog.  I hope each and everyone of you 
have a very Blessed Thanksgiving.
Feel Free to Leave some 
"SCRAPPY LOVE!"
Mylissa