Translate

Thursday, August 4, 2016

CREATIVE CHEMISTRY DAY 4

THCC Day 4:  Distress Crayons

Here they are...and guess what...
MORE are coming!
I can't wait ...there are more shades and pastels,
LOTS more!!!!!
If you have not tried these crayons...
Well....you just oughta...
They are FABULOUS...
Kind of like gelatos, but better.  The most 
important thing about these crayons is that they
won"t  react with water unless you want 
them to, all you have to do is touch it.
Get ready to get your fingers dirty!
Tag #1 Distress Crayon Smudge
Get your fingers dirty...Smudge those colors....
all over a layer of Texture Paste.
 This was sooo much fun...
Yep I put only warm colors on here...
guess I need to make one with the
cool colors....YUMMY!

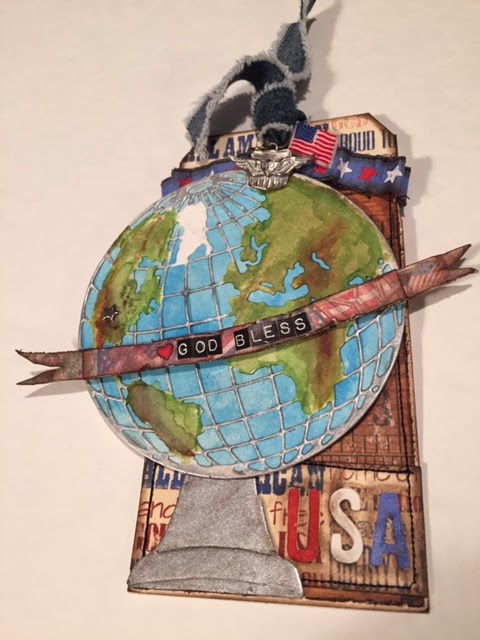
Tag #2 Distress Crayon Gesso Fresco
1st step - apply gesso, 2nd step - more smudging!
3rd step - use stencil and gently rub with damp
paper towel to lift color.
These crayons are so much FUN!!!!

Tag #3 Distress Crayon Textured Resist
The crayons were used like a modeling paste for this tag.
It's just a really thin layer used on the stencil and you go
over it with you finger and continue to smudge inside the stencil.
I really enjoyed this.  
 As I began inking this tag and the design appeared,
I was like Ahhhh, the pink is soooo soft and pretty,  just 
what I wanted to see. This is Tim's "Scribble" stencil.

Tag #4 Watercolor Resist


Tag #5 Distress Crayon Blended Background

Ohhh La La....I am in LoVe with these
crayons....smooth like butter and see how the
colors LoVe each other....Just by blending with 
water ...watercoloring with crayons...XOXO

Tag #6 Distress Crayon Layered Coloring 


First stamp your image, then apply your
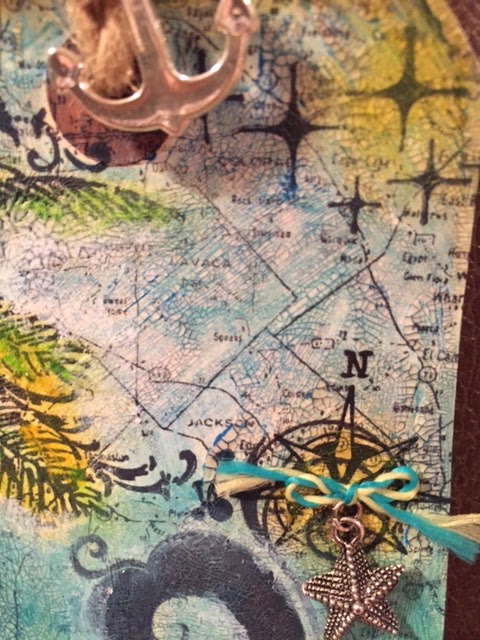
collage medium...I used "CRAZING,"
(Two coats, first with a brush and another....
I used my finger -as suggested by the
Master himself- Tim Holtz.)
let dry, apply color with Distress Crayons,
smooth/blend colors, (I used my fingers), 
you can also use your water brush! 
Next dry the colors (this sets them), 
then use Picket Fence Distress Crayon
 to hi-light certain edges of your stamped images.
is just Fabulous here....see all those 
teeny, tiny cracks.  LoVe them!
Thank you for taking the time to stop by!
Leave some Scrappy Love if you'd like!


Wednesday, August 3, 2016

TIM HOLTZ CREATIVE CHEMISTRY 103

THCC Day 3:  Distress Collage Mediums and Texture Pastes

I have always loved creating collages
AND 
Looking at old photos.
I sat with my grandmother and my father
looking at photos and watching them place 
photos in albums.  As they worked they would 
talk to me about all the details of the photos:  who was 
in the photo, whose side of the family they were on, and how they
were related.  
I had purchased the Vintage Distress Collage Medium some
time ago and fell in love with the appearance it 
gave my projects.  It brings back the memories
I have of looking at family photos of people long ago.
My father would really love this medium if he were here.
Tag #1 Distress Layered Collage


The Distress Vintage Collage Medium along with the
Distress Crayons worked  "PERFECTLY" for
aging this project.  
Tag #2 Texture Paste Coloring
 Tag #3 Texture Paste Embossing
I didn't have the proper paste for this project so
I gave it a go with something else that I love to use...
This stuff is sooo much fun...
so here is my tag with a different product.
Tim is always saying...practice...try new things
...you might discover something fabulous.

This could be a beautiful piece of fabric....
I am always in AWE when I use this stencil.
THS032 Flourish
Tag # 4 Texture Paste Resist
These tiles on this tag were made by using 
Tim's Tiles Layering Stencil # THS042
and the Transparent GlossyTexture Paste...
Tim used Picket Fence Ink on his tag to
highlight the tiles.  Mine is ordered so 
I just used some Distress Walnut Stain Ink on mine.
I love how this turned out.
Tag #5 Distress Grit-Paste Grunge
I really liked this product.
I don't mind getting my hands dirty at all,
so I applied it with my fingers just like
Tim suggested.
Then I applied the distress crayon.
It's really best to smudge the color in
with your fingers.  The color just blends and
smooths out and softens.
(If your finger gets sore...you can switch fingers
or use a rag).
The Grit-Paste looks like tree bark to me here.
My father love the Smoky Mtns. which is where
this photo was taken.
For me....I would say this is a keeper!!!!
Thank you for taking the time to stop by .......
leave some crafty love if you'd like!
Mylissa


Tuesday, August 2, 2016

TIM HOLTZ CREATIVE CHEMISTRY 103

Creative Chemistry 103 Day 2

All about Paints and Stains

I just have to SHOUT....
"I AM EXCITED ABOUT CREATIVE CHEMISTRY!"
I am loving it!
I set a goal ....
I am going to try not to OVERTHINK THINGS!
I am going to BE BRAVE...
THIS is FUN and AMAZING..
and I am not going to worry about how any  of 
my work turns out...I can redo, practice, and 
continue to improve....
THIS IS FOR ME!
Here is my tag for
DISTRESS PAINT RESIST...

As you can see...my tag is going to help me to 
REMAIN FEARLESS
TO BE BRAVE
(more tags to post later)
LOL....I wish there was no such thing as sleep and
interruptions...
Here are the other 4 tags
Distress Paint Lifting
Distress Stain Rub Resist
Distress Luminous Mica
Distress Marker Spritzed Watercolor

The first four of these lessons were FABULOUS...
Here is a little information about each one....
Tag #1:  Distress Paint Resist
I have stamped with paint many times, but 
I found the added layers so very interesting
and it added so much depth to my tag.
I LOVE THIS!
Tag #2:  Distress Paint Lifting
I definitely need to switch to flip tops on my paint.
Here is why....

 Yep if I had switched my tops...this wouldn't have 
happened!  I have some...I need to count my paint and 
purchase some for the rest.
I am in love with this technique...this is also 
perfect to try if you like to art journal.
For me I wrote the steps down as a reminder.
I kept wanting to put the stencil down and then paint.
(yep I sometimes have trouble following directions and 
want to go off into the sunset -LOL)

My mind was focused on what color of paint / stencil to 
use instead of the technique.  I love how this finished tag 
turned out.

Tag # 3:  Distress Stain Rub Resist
I  have always enjoyed rubbings.  
I found that my Basic Grey Roller Stylus just
didn't have the oomph I needed to transfer my
rubons.  Of course I didn't want to use my stash of 
Tim's (I will save those for the perfect project)
so I used something older.  So I switched to an old 
bone folder.  The reason I liked using this tool is
that the tip of the bone folder has a larger surface and
 I was able to transfer the image faster.  Rubbing lots
of items can sometime take a while with a small tool.

I am sorry Tim....but by the time I heard you say put 
random images around the edges of your tag...
I was already going for a complete image....
Right smack in the middle!
I wouldn't change anything about this tag...
LOVE IT!

Tag # 4 Distress Luminous Mica
Here is my tag BEFORE
I sprayed it with Distress Tarnished Brass
I love how there is so much going on with these
colors....I really didn't want to spray it...
but I was GooD and did what the teacher asked!
And spray I did!  Be careful with the sprays...
they are very good at what they do!
More info on Distress Mica Sprays and
Distress Spray Stains -
( I did NOT have the Mica Sprays)

 Distress Metallic Spray Stains are metallic pigment in a colored liquid
– Distress Mica Sprays are metallic mica in clear resin

Tag # 5 Distress Marker Spritzed Watercolor
O K I am going to be honest...
I am not CRAZY about this technique....
I have tried this several times and out of all the
techniques...this is my least favorite.
(maybe I need Tim to hold my hand)
Out of all the markers I tried...I only got two to
work....I probably would of had "MUD" on my
tag because after a while...I was just picking up
markers trying to get them to work...I didn't care
what color it was.
So yes...I finally gave up and just used my spray 
stain...I like how it turned out too!
I have to give Tim some credit here...he was 
very enthusiastic about his project!  
I PROMISE Tim...I will continue to practice 
on this technique!

Hooray...DAY 2 Tags Completed!


CREATIVE CHEMISTRY 103

Time for Creative Chemistry 103
 (with my favorite teacher:  TIM HOLTZ)

I can't believe it....
CC103 has arrived.
I am pressed for time to get 
everything completed in one day.
No worries right.
I will just keep at it until I finish.
First tag completed:
Distress DIY Ombre'
I have two more completed and two more
to go....
 LOL!
AS Cher would say...
"If I could turn back time"....
Right now it is almost 4 AM...I better get some
sleep so I can create more tomorrow.
Here are my completed tags from Day 1:
Distress DIY Ombre'
Distress Highlight Stamping Technique
Distress Off-Set Stamping
Distress Washed Watercolor
Distress Micro-Glaze Resist
 
I tried to pick a favorite, but I couldn't.
There are things that I really like about each tag. 
Even though they are all different styles and 
techniques, I enjoyed creating all of them.
I have quite a bit that I still need lots of 
practice on, but it is exciting to see 
improvement in my skills.
Of course you can't help but 
improve with the greatest teacher
in the whole wide WORLD:
TIM HOLTZ!!!!!


Wednesday, July 27, 2016

TIM HOLTZ 2016 JULY TAG

Tim Holtz 2016 July Tag

I love Tim's July Tag!
Don't you???
It's Perfect for a travel theme!
If you would like to make Tim's Tag...just follow 
this link for all the directions you need to create it.
Tim ALWAYS AMAZES!!!!
This man is like an EVER READY BATTERY!
The ideas just keep on coming!
So Tim provided my inspiration, time to gather
my supplies to create my very own July Tag!
I having been wanting to use this die for a LONG time.
It was really a lot of fun to work with and once I 
began painting it....I couldn't wait to see the end results.

This die was deceiving in it's size, but as you can see,
it took center stage on the tag without any problem.
WOW...the details on this die are fantastic.

I used this circle as a base for the world die.  
Because this was such a large space,
I ended up switching to Broken China 
and Tumbled Glass Distress Inks along with
 Tim's Waterbrushes to color this circle,
for the ocean blue base. 
 I like using the distress ink pad for coloring larger areas and 
using the markers for smaller detailed coloring.
I found this photo of the world map on the internet.
Having a visual was helpful to me when I started
 coloring the world.
So now I attempted to pick a back ground paper.

I cut it, distressed it, inked it...and after all
that I thought the paper was just too dark....
I am thinking about changing it ....but I will
continue to work on my tag .....Mmmm
yep...I will have to change this paper.
 I want the world globe to be on a stand...
I didn't want it floating in space.  So I used
the bell die and cut some chipboard.
Then used some Pewter Paint on top 
of it to give it some shine and inked the
edges with Expresso after it dried. I then cut
the loop off the top of the bell and then
cut off the curve of the base. I thought the globe could sit on this.
Next I placed the globe on top of this and 
realized I needed to make a slight bowl in the
top of the bell for the circle of the globe to sit on.
I just turned the bell over and traced the curve of 
the globe on the back and cut it with sissors.
The top outside edge points needed rounding too after making 
the bowl...a tiny little snip is all that was needed.
Time to make the word strip at the bottom.
Something simple:  USA
with RED, WHITE, and BLUE watercolored
underneath.

I like this...but that dark paper has got to go.....
I like this much better....
So I repeated the process with cutting, distressing,
and inking. 
 I am going to try something out of my 
comfort zone....I am going to try and stamp with
different colors on the stamp ...I hope this turns out
so I don't have to redo anything.  I put a little tape runner
glue on the cut out letters and set them back inside the letter.
This protected the watercolor letters since I had already 
glued the two parts together.  

I like to keep the insides of letters to glue on after 
cutting...like the triangle in the A and the circle in the O.
 I really "LOVE" how this turned out.
I don't normally ink with the distress inks, but
they were calling my name here.  I also stamped 
this same image at the top of the tag in the blank 
space there....Next....time to sew around the edges.
Almost done....A banner hand cut from Tim's Seasonal
Paper Stash Pad...(the Tattered Banner Die was too wide for 
the tag).  It got it edges distressed and inked too with Expresso.
I used Tim's Tiny Types (cut down in size) for
the words, GOD BLESS.
Then an inked heart cut from the Fiskars Heart Hand Punch found it's
home on the banner.
What next...it still looks unfinished to me.
A paper ribbon made out of the star die ....blue cardstock with 
red and white cardstock behind the blue...inked with 
Expresso and stitched.  This fit perfectly accordian folded at the top.
Then one of Tim's Star Fasteners on the USA continent, a flag pin at the top, some
military wings painted with Pewter Paint and hung on a couple of jump rings,
and some AMERICAN blue jean material for the ribbon and I am
 FINISHED!!!!!
2016 July Tag:  GOD BLESS USA!!!!
 
 
Happy July....
Thanks for stopping by and as always....
Feel Free to leave some "LOVE!"