Translate

Wednesday, May 25, 2016

TIM HOLTZ 2016 MAY TAG

Tim Holtz 2016 May Tag
It's TAG TIME
 Tim's Tag is soooo BEAUTIFUL. 
Here is the link to Tim's tag and the directions on how 
to create it:
However... I didn't have this stamp or the spoon or the
 TinyTattered Florals die.  I have lots of 
stamps, but I am not into buying images of people.
So I knew I would really have to think about what I was
going to do with this month's tag. I didn't really want to
do another photo tag of my mom...I already have several 
of those....MMMMMMmmmmm what to dooo????
Going through my stamps really helped me here.
I found this one stamp that I had purchased  that
had this beautiful child's face on it.  Yep...it's what I am going with.
Here is my Month of May Tag.
You are right ....this tag has NOTHING to do with
the month of May... I just went with the 
creative spirit.
See the beautiful child's face on the stamp....
When I was making this tag...I had no idea what the name 
of this stamp was.  I thought....this is so sweet and the face is so round
like the moon....I thought...."Love you to the moon and back"....
I looked at it and it made me think of another
stamp set I had which I will share with you further into this post.
I really had to stop thinking about Tim's pretty tag so I could
focus on creating something totally different.
So following Tim's directions I applied my washi tape.
Here's the To The Moon stamp set.  I purchased this awhile back
from Simon Says Stamp. I partially stamped the images onto
Now to apply the modeling paste.  
It doesn't take much.
Here is a close up of how well
the modeling paste went through 
the SPECKELS stencil.

The distress ink colors were an easy choice.
Sticking to blue, pumice stone and
some white!
Today I was being really lazy.  I just took a large bag and
set my tag in there to spray... I may do this again.  I had 
enough ink left in the bag to put my ribbon in there and get it all inky.
I do not like to waste my colors. LOL!

 Ohhhhhh....it's looking soooo Pretty!

 Here are the colors I used.
 Let's dry this baby....
  Does this have the look of the moon surface...
I have never been there but I have heard of a 
"BLUE" moon.
 Lots of little ink drops still in this bag.
Just enough for my Tim Holtz Crinkle Ribbon.

Time for the final embellishments.
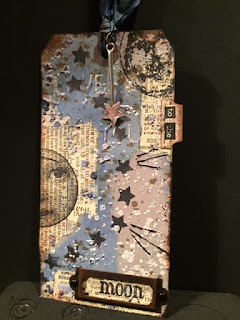
A little charm to dangle from the ribbon.
A label for the word moon.
Some distress ink for the edges and
a few stitches on the sewing machine to look
like shooting stars.
A tiny tab for Tim's Tiny Types "to the"
(black and white).
I cut the tab out of paper scraps.
(I was tooo lazy to even get out my mat...
I just used some old chipboard)
Time for a little more ink spray.
I just unscrewed the top and shook the straw
part of the sprayer over the tag.
I really like the way this "DROPS" onto
the tag.
I blotted the excess off of the washi tape.
Ta Da.....ALLL DONE.
Can you still read it????

LOVE YOU to the MOON!


I was trying to get the pretty shimmer in this photo.

Here's my "MOON" Tag for the month
of May.
Hope you liked it!
Thanks for stopping by and leave some
"LOVE" if you want!



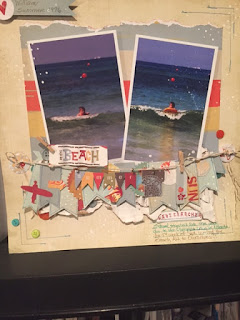


BEACH LAYOUT

BEACH LAYOUT

In 2011 Fancy Pants came out with an
awesome paperline called Wavesearcher
that I fell in LOVE with.  I immediately had
to purchase everything that went with it.
 "YES" I was CRAZY..
in LoVe with this paper."
One of the reasons I had purchased this line
was Nic Howard created this AMAZING 
layout using it and I knew I just had to 
make it tooo......
Nic Howard Layout 
Finally after five years I got around to making this 
fabulous layout.
I just loved making it. So much fun. 
 
I was so excited to have finished this layout.
I will share with you what happened to it.
I was trying to finish it and of course it was late at
night.  (That's the only time I get to myself when I'm
not interrupted).  The last part for me is the journaling.
I should have waited until the next day, but I wanted to 
FINISH!!!! Imagine picking up something to write with
and not looking at what you picked up and HORRORS....
it was NOT the right pen....
anyway....if I had waited I wouldn't have had the 
problems that I did.  It ended up being OK...not what
I wanted ...but the important thing is ...MISTAKES 
are FIXABLE.  If I had to ....I would have trimmed 
around the layout and put it on another 12x12 paper.
 So here is my LO ...almost finished.
Here's my mistake....AHHHHH!!!!!!
 Trying to repair......

It's going to live....and so will I.
Relief!
So I have two boys and now I wanted to make a 
matching LO for my youngest son.
Here is his LO:
Because these photos are horizontal I went vertical with the
chipboard layer. 
To start this layout I used Tim Holtz Rays Stencil THS003
I used Tim Holtz Mustard Seed and Wild Honey Distress Ink on the 
stencil fading the color as I moved toward the edge of the paper.  
I just moved the stencil around the page applying ink
get the look of the rays.  
 The sun is cut from the Sizzix Blazing Sun die. 
I cut out all the pennants and stitched them just like I did
on the first layout.  The surfboard at the top is made from 

There is a small image to the right of the Wavesearcher
Journal spot that looks like an eagle. It came from the BoBunny
Cambridge Paper line. Just a little scrap I had in my stash to add
some interest. I set it on top of some scratch paper from the collection
  In the bottom left corner I used a new die I purchased on
I just LOVE it.
I think it was the Perfect addition to the layout in 
the lower corner.
No mistakes journaling on this layout.  Now I have a
layout for each son to keep.
Thank you Nic Howard for the inspiration!!!!


Saturday, April 30, 2016

TIM HOLTZ 2016 APRIL TAG

Tim Holtz 2016 April Tag


Here is the link to Tim's birdie directions...if you want to
follow along to make one like Tim.

I can't believe this month is over and I am rushing
to post my tag.  I got together with my girlfriend,
who LOVES to create tags as much as I do, at the 
beginning of the month to create this months tag.
It has been soooo crazy at my house that 
I am just now getting around to posting this.  

I liked this months tag simply because I LOVE BIRDS
...and I looked forward to learning how to do something new.
 That is one of the things that Tim's inspires in me...
and gets me excited about creating.

My girlfriend and I had  FUN creating this
tag and deciding what products we could use to get the
"LOOK" of Tim's tag.
We were unsure of this new process so we decided to
stick close to Tim's design.

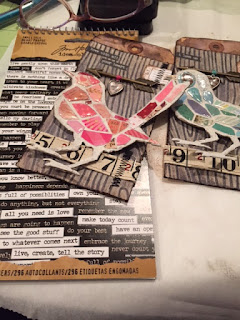
Soooo Here's My Tag(s)

Cut out your birds using chipboard.
I meant to have them facing each other
but I got caught up in the creating process 
that I forgot...LOL!
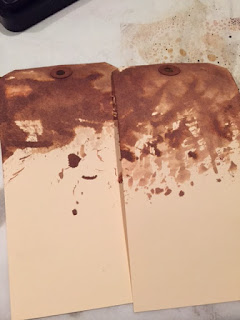
 I did not have the Distress Paper Mosaic Kit.
We decided to just use some Teresa Collins Modeling
 Paste instead.


I thought this process was really fun.....
and as Tim said...kind of therapeutic....cutting
up little bits of paper and gluing them on.
(I used all scrap paper for both of my birdies).
It doesn't take much.
 I also didn't have Tim's wood grain paper,
so we made some by using the Teresa Collin's 
wood grain embossing folder and then  I used
the antique linen paint on the base just as Tim
did.  I then used some distress stain and ink
for my wood grain colors.

I then distressed the edges and inked them.
Now for the tags.  I only put color on the
top part of the tags when I noticed that the
rest of the tag wasn't going to show.


I always LOVE making this distressed look!
I never get tired of it.
Glue the wood grain on top of the tags.
then ink the tags.
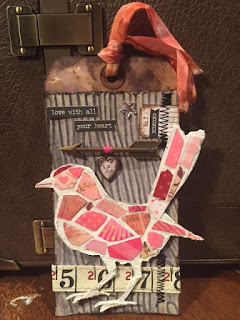
Now it's time to put my birdies on the tags
and embellish them.

I decided to use the heart charms instead of the 
number tokens to dangle off of the arrows.  
(I think I ended up using Hobby Lobby's 
Paper Studio's brand of arrows or Maya Road).
Then I made my own ticket at the top using a 
stamped image (Fiskars Teresa Collins Noteworthy 
stamps) instead of using vial labels.
Stitch the ticket at the top and also 
stitch the ruler ribbon on the bottom on
the right side and on the staple the
ribbon on the left side.
Oopsies...I have a lead foot today...
Really heavy on the zig zag design...
I didn't pull it through the sewing machine 
fast enough.  I still love the stitching and 
the extra layer of dimension it adds to the tag.
This is starting to look really cool as it comes together.
I chose thread to tie the hearts onto
the arrows.  The holes on the hearts are tiny
so it worked out PERFECTLY and I love
the extra pop of color it added.
Now to choose my sentiments and add my stars. 
I also added a sentiment to my ticket at the top.

I didn't have my alcohol ink with me so I just left
the star natural. 

Oh...I just love them.....Glue on the birdies...and 
now its time for the ribbon.
Yep a blue one and a pink one.


TWEET TWEET....now aren't these SWEET!!!!!

My girlfriend and I got to play for 
FIVE days straight...
uninterrupted ....
For REAL!!!
 
Thanks for stopping by and 
feel free to leave some LOVE!