Translate

Monday, April 11, 2016

SIZZIX GIVEAWAY

SIZZIX GIVEAWAY

If you've ever daydreamed about trying out the Sizzix Big Shot Plus, this is the giveaway for you! The $2500 Ultimate Sizzix Designer-Bundle Giveaway is an an amazing chance for 5 winners to receive a $500 Big Shot Plus Starter Kit PLUS loads of accessories from designers Stephanie Barnard, Eileen Hull and Jen Long. More details here So, drop everything you're doing--unless you're, say, holding a baby or a crystal vase--and enter this giveaway now for a chance to win big! 

Monday, March 21, 2016

TIM HOLTZ 2016 MARCH TAG

Tim Holtz 2016 March Tag

Here it is...Tim's new tag!


It is just BEAUTIFUL!

If you want to make this tag, then follow the link
to Tim's Blog and he will give you all the directions
you need to make this BEAUTIFUL tag!!!!!

What I particularly LOVE about Tim's tag
are the colors and the design that just
blast out at you from inside the butterfly shapes.

 I can add the color because I have his 
FABULOUS new Color Distress Crayons.
 They are sooo creamy and smooth. Like 
lipstick only you can take your finger and just
swirl the colors together to blend them....
LOVE!!!!!

But the new Mixed Media #2 Thinlit Die  I do not have.

Read on to find out what I used instead.

Here is my March 2016 Tag:
I  tried so many dies trying to find something with
a negative image that would give me that gorgeous 
design peeking through the butterflies but to my dismay.....
I couldn't find anything that I thought was as pretty
as that design. 
So I decided to go at it in a different direction.
You can't see anything around the edge of the tag right???
So I decide to cut out my pretty design and
glue it onto the middle of the tag....

HOORAY....
I now have a pretty design...not as pretty as Tim's design...
but it suited my purpose.
I am not going to tell you how long it took me to 
finally come up with that idea!  LOL!

 This is just a few of the designs I tried.
Yes!!! Tim's new WILDFLOWERS DIE #661190
are  there....LOVE this new die!!!!
I really am liking these designs.
Especially the top two (which are the same).
The details are intricate and small in design so
I thought they might show up better in the small
space.  
They are from this Spellbinders die
 I glued some Tim Holtz Idea-ology Tissue Wrap -
 Postale to the base of the tag with Ranger Glue n' Seal. 
Then I glued on the two designs and applied White Gesso.


Decision made...I can finally move forward.
I made my corrugate tag layer.
 I began applying my color.
For the corrugate tag I applied white Gesso
and Mermaid Lagoon Distress paint.

I used Sizzix Framelit Die- Simply Lovely #659527 and
Teresa Collins / Craftwell Memory Collection DS-MEM-TC002
for the butterfly cut outs.
I picked some distress crayon colors for the base tag.
I ended up choosing some softer colors because I wanted
my tag to be different.
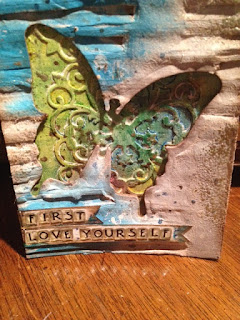
You see my little butterfly...well everything I did
(beginning with gluing down the design to the base tag),
I did the same thing to that little butterfly.
I couldn't forget that cutie! 
Before gluing it down, I separated the corrugated
layers to give it more dimension.  

 I then went through the steps for adding some foil
bits to the outer corrugate tag and some foil bits to my
base tag from this tutorial:
http://timholtz.com/12-tags-of-2014-november/
I absolutely LOVE this LOOK!
Then it was time to glue the two tags together
using Rangers Glue n' Seal.

I then distressed my tag with some Picket Fence,
Faded Jeans and some Walnut Distress Spray Stain.
I didn't spray it on the tag...I unscrewed the sprayer
and tapped it on my hand over my tag....for
just a "little bit of splatter."


You can see the shiny bits of foil
inside the butterfly cut outs and along the
outer edges of the tag. 

I inked all my edges ...even inside my cut
outs with Walnut Stain Distress Ink.
It's interesting to me when you STARE at the above photo,
that it looks as if the butterfly could be on top
of the corrugated layer too when it is actually underneath.
Sooo COOL!

The FINAL STEPS
.....making the quote and adding the ribbon.
I used some Bo Bunny Double Dot
Dark Denim Vintage card stock Item # 12DDV876
(which I had in my scrap pile)
to make my letters: F. L. Y.
using Tim Holtz's Sizzlelits Alphabet Typeset Die, I
cut them out with my Vagabond.
I glued my letters to some scrap white card stock and
then cut out a pennant ...freehand.
I then found the adorable Autumn Leaves epoxy stickers by
Sarah Bond in my stash.  They are so tiny and so perfect for
the base of my tag.  I put them on white card stock and
cut out pennants freehand here also.
I then inked and splattered some paint onto
all the pennants and stapled them to my tag
using Tim Holtz's Tiny Attacher.
The final touch was adding some burlap wired
ribbon at the top.  I, of course, distressed it a little
using Distress Walnut Stain Ink..and a little dab of Mermaid
Lagoon  and Pewter Distress  Paint.


 This month's tag took a lot more effort
to create.  I knew what I wanted...it just
seemed to take forever to get there.  That is
O. K.  I kept at it because I really wanted to
get my design out of my head....and for
me to be able to actually figure out how to recreate
what I visualized and not give up is
SOOO EXCITING! 
I give that credit to TIM...he provides the inspiration and
MOST of the tools I use to create!!!!!


Thanks for visiting....Feel free to leave some LOVE!

Mylissa


Saturday, March 5, 2016

Ken Oliver Crafts/Impression Obsession Blog Hop!

Hop picture
We have some beautiful projects to share AND PRIZES to give away! The hop will run for 2 days (3/4/16 - 3/5/16) with a list of participants on the Ken Oliver Crafts and Impression Obsession Blogs each day at 8am EST. Visit the fabulous designers from both team’s blogs (only one comment per blog please) for a chance to win 4 great prizes during the hop!
The more blogs you visit … the better chance you will have to win!!!
Ken Oliver Crafts will be giving away a set of Color Burst to two lucky winners!
Impression Obsession will be giving away a $25 Gift Certificates to two lucky winners!
Four chances to win a great prize through the hop!
Comment entries will be open until 9pm EST on Sunday March 6th and all winners will be announced Monday March 7th on the Ken Oliver Crafts and Impression Obsession Blogs.  Good luck!

Here's the link:

Have you tried "Color Burst?"
Tell me what you think about it....I really want to know. 
It looks like fun too!

Thanks for visiting and it's O. K. to leave some
scrapbook LOVE! 

Mylissa


Saturday, February 27, 2016

2016 TIM HOLTZ FEBRUARY TAG

2016 Tim Hotz February Tag


February brings forth such wonderful memories to
my mind of making fun cards and projects for 
Valentine's Day. A month full of love and sharing
and giving to those that we love.
 As usual Tim captivates us with another 
tag filled with lots of good stuff.
To check out how Tim created this lovely
tag, just follow the link to his blog.

This month I got really carried away
on my tag and only followed the directions 
for making my base.
Ohhh but I had such fun going off on my own!
Here is my February Tag:


Now here are some photos of all the supplies
I used..the only thing missing is some 
cotton that I used for the eggs and some 
Tumbled Glass Distress Ink that I used to
color the eggs and I just typed the word 
"together" on a typewriter.
LOL....at least I think those are the ONLY
few items I left out!


After making the base for my tag,
I took the stamp of the single rose
and stamped it toward the bottom of
my tag using some Frayed Burlap
Distress Ink. Oopsies...I left out this
supply...but it doesn't really matter
because after I put EVERYTHING
else on the tag...you can't even see it.
(It was really pretty before I covered
it up).  You can see some of the leaves
peeking out at the bottom because I
stamped it more that once.

I then decided to use my Teresa Collins 
embossing folder:  So In Love.
It made these lovely little hearts
all over my tag...Yes...I am a heart
lover!  I just gotta have a heart somewhere 
in my project.
 Then I randomly painted some of them with
the Distress Tarnished Brass Crackle Paint.
I then started laying out my embellishments
so I could figure out my placement for 
EVERYTHING.  So since my photo was 
going near the top, I wanted to have the word
"love" by it.  So I made a little stencil from
Teresa Collin's "love" punch.  I "LOVE"
that it is in cursive....I applied Finnabair
Gold Crackle Texture Paste and then added
some of the Distress Tarnished Brass
Crackle Paint to it too, because I didn't
apply enough of the Gold Texture Paste.
 No mistakes right..I just tried to get 
enough on there so you could read the word. 
I then cut out part of a rose design from
some Valentine paper and put it behind
the heart frame.  I then applied Glossy Accent to 
the center. I stamped the birds using brown ink onto
a soft blue paper, cut them out and put them on 
chipboard and cut that out also and glued the 
birds to the top of the frame.  Oh they are really
"tweet" on it....Ha Ha!

I distressed the photo and added some
 Distress Vintage Photo and Walnut Stain Ink.
 I cut out the word "US"  using the Typeset die.
I cut out two hearts to use
as photo corners on my photo and added the Distress
Crackle paint just around the edges at the top.
I used Tim's Heartfelt die...I really love how they 
look...especially with the touch
 of crackle paint on the edge.

I took some twine and wrapped it until I had
the shape of a bird's nest and applied some glue
and some smaller pieces of twine to look like 
twigs, and added my bird eggs.  They are made out
of small bits of cotton and I added just a touch of
Tumbled Glass Distress Ink to give 
it a touch of blue color. This was going to be nestled
below the frame with the flowers.
Next I got busy making some flowers and leaves from
scratch paper. I used the Tattered Flower Garland
and the Festive Greenery dies.
 I inked everything...made my banner,
(I just typed "together" onto some paper
and cut it out).  

One thing that I have found helpful when I get ready
to glue things down is to take a photo of
my project.  This helps me put EVERYTHING
right back where I want it to go.

Then I got busy gluing EVERYTHING onto the tag.
I took some white ribbon and applied some Tarnished 
Brass Spray Stain and some Antique Linen Stain 
to it before I tied it to the top of the tag.  

I hope you like my "LOVE" tag!


Wednesday, February 24, 2016

GIFT FOR GIRLFRIEND

My GIRLFRIEND is MOVING

Out of the blue...My girlfriend said:
"WE'RE MOVING!"
We have both been very busy lately
and haven't been able to scrap together much.
But still we talk at least several times if not more
a week.  This is part of life.  Moving forward,
changing, growing...learning.
This doesn't mean we won't ever see each other
again.  This just means CHANGE, and hopefully
some TRAVEL...as we hope to still GET
 TOGETHER!  
GIRLFRIENDS FOREVER ..RIGHT!!!! 

I decided I wanted to make her a little 
something.
So I went online to find her home that was
already up for sale and copied it.
I thought a little something to remember
her home by would be "PERFECT!"
It didn't take long to make this little project.
I thought this can be made into an ornament
or she can leave it out on a side table.
I will tell you this...when I gave it to her,
She got all choked up and tears appeared
in her eyes....so yes...it was 
appreciated and I felt sooo good that I was able 
to give her something that she would CHERISH!

So here is what I made:


The first step was to print the photo.
I then started with my base.  
I used some art mat board 
(I cut it on a large trimmer)
and covered it with some wood paper.
For my measurement I left about 1/4th inch
on the sides of the bottom base. 
Then I picked out some brick paper, because that
was an element in the photo.
I mounted that paper onto chipboard...leaving
more of a boarder at the bottom for my 
title.  I also mounted my photo onto to chipboard.
I glued all three bases together. 
I used a Studio Calico wood embellishment tab and
added Tim Holtz's Label Letters for the date on the tab.
I found some Scrabble letters in my stash and glued the tab
and the letter on with hot glue.  
I was amazed out at how quickly 
this cute project came together. 
So a little gift from my heart to hers...

Oh...speaking of hearts...I added one more embellishment
that isn't in the photo which really was special...
I put a tiny blue heart on the window on the right.
It really popped out because it matched the sky  ...
(and my heart was feeling blue because I was
going to miss her).
Lots of Love ....It's what we need ...
I hope you liked my little project.


Friday, January 29, 2016

TIM HOLTZ 2016 JANUARY TAG

Tim's 2016 January Tag


Here is is ...
Another year to make
TIM's TAGS!
This makes me excited!
Yes... A NEW YEAR...
A NEW START
and
A NEW BEGINNING.

Right now things are happening in
my life for my oldest son
that will be LIFE CHANGING!
So taking a little bit of time
to be creative gave me some
much needed down time.

For my tag I kept the same base
with the foil tape at the top and
luckily I had the same 
texture fade, which I LOVE!!!
I also added some walnut stain
distress ink.
But after that I started making 
changes.

Here is My JANUARY 2016 Tag:


I have always wanted to use the 
cracked pistachio distress paint on a frame
 when I saw Tim use it last year in January.
It is such a beautiful color.
I used his Ornate Frame die and cut it out
using chipboard and black cardstock.
I glued them together and then
dabbed the cracked pistachio onto the 
black cardstock.  I thought it was 
going to be really smooth, but it gave
me a mottled effect which I just 
loved.  It looked like marble.
After that dried I applied 
glossy accents.
I then rummaged through my 
scrap bin and found some paper
that appealed to me to put behind 
the frame.  This was going to be my 
clock base.  I ran the paper through
my Vagabond using the Ornate Frame
die. I used the inside oval part to glue
behind the frame.  I then used the game 
spinners...a large and medium...in the 
center of the oval and attached them with 
a paper studio pearl brad to turn this frame
into a clock. 
I just want to say that I was really liking
this outcome.  
I then found 4 very small pearl bling,
and glued one at 12:00, 3:00, 6:00, and
9:00 on the clock.
I then picked out a word band.
I chose:  THE JOURNEY AWAKENS
THE SOUL.
I chose this one because of the Life
Changing Event that we are praying
takes place for our son.
It really just seemed to FIT.
I attached the word band with some
black seam binding.
I don't know where my black twine was
hiding ...but I couldn't find it anywhere.
I found a silver/pearl heart charm in my
stash and some ribbon.
Then I used the Tabs and Tags die,
and along with the mini numbers made
a mini date tag.
I opened the heart charms jump ring and put
the date tag through it and then 
put the ribbon through the jump ring
and tied the ribbon at the top of 
the tag.
All done!
OH I JUST LOVE THIS TAG!

 My craft time is over way too soon for me.
I hope that the next time I am able to visit my
blog that I can share some really happy news
about my son.
I am really pleased with the outcome.
I hope you like it too!

Saturday, December 26, 2015

TIM HOLTZ 2015 DECEMBER TAG

Tim Holtz 2015 Dec. Tag


May I have a DRUM ROLL PLEASE....
"BANG BANG TAP TAP THUMP THUMP"....

Here it is...Tim Holtz 2015 December Tag..
THE LAST ONE of THIS YEAR...
If you are interested in making this tag
just follow the link to Tim's Blog and he
has the directions right there for you!

 I just LOVE THIS TAG..
It is sooo me...
and the basic components of this tag
were very simple and fun to do. The main thing 
that took the most time were cutting the
leaves, inking and shaping them
 and gluing them on.
I am also feeling so proud of 
what I was able to accomplish......
I completed every tag!
 (My first tag was
late - sooo sorry...and I also completed 
some older tags that I found that appealed 
to me - I just never posted the older tag versions).
I am definitely  hooked on creating TIM'S TAGS!
If you haven't done this...you should ....
it is soooo much FUN!!! 

Here is my 2015 DECEMBER TAG:


Here is what I did different.
I used regular burlap, because I didn't have
the self adhesive textured surfaces.  I just
glued a burlap rectangle to the tag and cut around it,
to cut off the excess.  I used Barn Door 
Distress Spray on the stencil.  I was worried that it would be
 too bright, but it was PERFECT!... I used my 
FESTIVE GREENERY #657467 strip die
because I didn't have the punches.
Oh and I almost forgot I used this little 
Martha Stewart punch too.  
I used some "Jingle Bells" that I had
from Michaels.  I didn't do any of
the stitching because my little craft
sewing machine broke recently.  (Boo Hoo)!
I used some red checked ribbon instead of paper,
and for the topper ribbon I used Tim's and sprayed it 
with Iced Spruce, Bundled Sage,
Tarnished Brass and Walnut Distress Stain .
My favorite part was making the wreath...it was 
really a "labor" of love.... cutting out all those
leaves, pinching the middles to make
the vein down the middle,  inking them,
 and gluing them to making the wreath.
I enjoyed it so much that I made another one. LOL!


I inked this tag using the ink left on my mat 
from my first tag and on the stencil.
I used the holly die cuts from the same die
and used paper scraps this time around.
I typed the sentiments on a typewriter,
tied the bells (also from Michaels) to some
twine, added some red bling for berries, and inked
my ribbon (TPC Studio - Holly Jolly #2010877),
before tying it in a knot and gluing it on. 
The Vintage Tinsel Ribbon #00392 was from Pink Paislee.
I used Ground Espresso to ink everything.
OHHH it turned out sooo pretty!
I hope this post doesn't come across
as too abrupt, but I had just a small
window of opportunity to sneak down
 to my craft room ..there is still a lot of
Christmas celebrating going on!
 
SO EXCITED AND SAD AT THE
SAME TIME TO BE ALL DONE
BECAUSE THIS CRAFTY TAG YEAR
IS AT AN END!
 
And NOW.... the most IMPORTANT part...
THANK YOU TIM HOLTZ 
FROM THE BOTTOM
OF MY HEART FOR THIS 
FABULOUS 
FUN FILLED
JOURNEY
THAT YOU TOOK ME ON 
FOR AN ENTIRE YEAR.
(My hubby was very JEALOUS! He didn't 
understand why I HAD to spend sooo much time
in my craft room) 

Sooo GOOD BYE my CRAFTY FRIENDS ...
until next time...because I do want to ....
continue this journey.....